What time is it? Adventure Time!
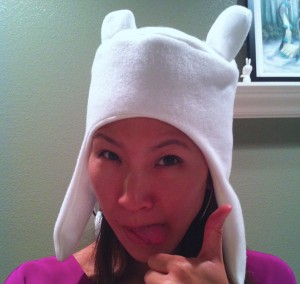 If there’s any cartoon that you might consider watching as an adult, I would definitely recommend Adventure Time. Its about Finn (the human) and Jake (the dog) and the sometimes weird and random adventures that they go on. I don’t know where the writers come up with some of the stuff on that show, but I can’t help but love the creativity they bring to it. And with Halloween coming up and me in the super crafty mood, I decided to make myself a Finn hat, which I proudly wore all weekend long around the house. Here’s a quick tutorial on how I made it.
What you’ll need:
- White fleece or whatever fabric you decide to use. I recommend something thick like fleece or felt or maybe even a foam type.
- Polyester stuffing/filler or even cotton balls
- Basic sewing stuff – thread, scissors, pins
Instructions:
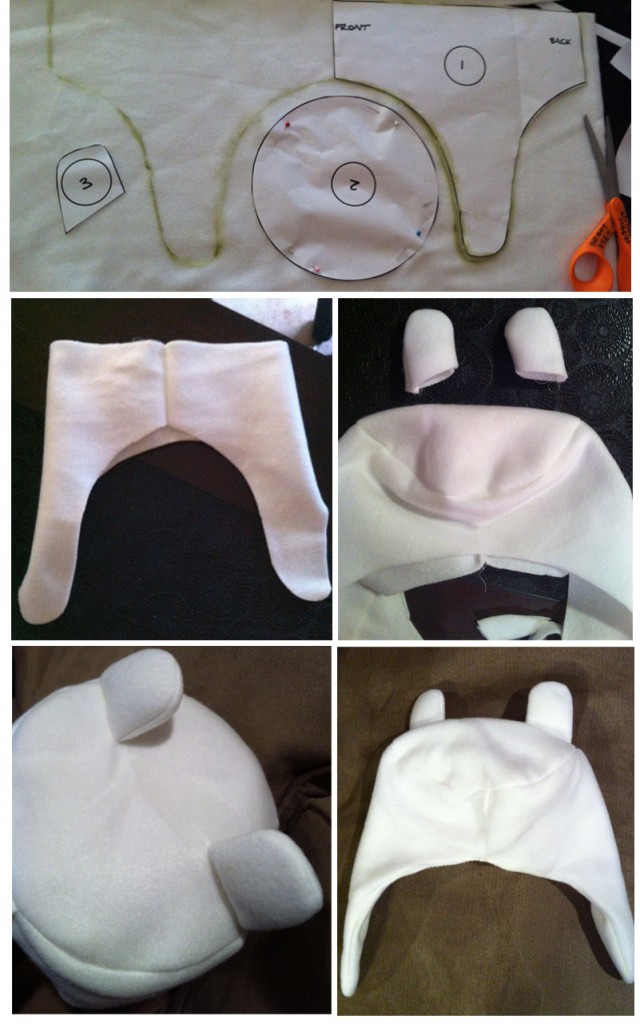
- Print out the pattern for the hat here. I ended up printing it on standard 8.5″ x 11″ paper and then using a copy machine to blow it up 150%.
- You will need about 1 yard of fabric. Fold this in half and lay the pattern out like the example below.
- Trace piece #1 and flip it over on the edge labeled “Front”. This is the main part of the hat.
- Trace piece #2. This is the top part of the hat.
- Trace piece #3 twice. These are the ears and obviously you will need two!
- Take piece #1 and sew it along the back edge.
- Now take piece #2 and pin it along the top edge of piece #1. Make sure you sew the right sides together so that when you flip it inside out, you don’t have any seams showing.
- Take your ear pieces and sew them together. Flip them inside out and stuff them lightly. Sew them closed.
- Taking your completed piece from step #7, and cut two slits. Insert the ears and sew them from the inside along the seams.
- Now we need to make the lining. Repeat step 6 and 7 again.
- Once your second hat is done (minus the ears), stuff that into the first hat you made, making sure the right sides are facing each other. Sew them together along the edges and leave a hole open so that you can flip the whole thing inside out. Once everything looks ok, sew the hole closed.
- Add some velcro on the bottom straps and you’re done!
And if that’s all too confusing, check out this video (skip to 1:10). He does a great job showing you how to do it!
26 Comments
Hero
Hawt tutorial
Anonymous
Thank u !! It was hard finding a website with actually having the printable pattern!
Haute Gamer
Love it! You should make a Fionna one next! :P
bob
to make fionna just do long ears and a blonde flip
Bobopolis
Yeh Bro
Anonymous
wow, you’re really talented. keep up the good work :) :)
susy I
what diameter must have the circle (2)?
emilyo
It’s about 6 inches, but just depends how big you print out the template. I would recommend using the template as a guide. Good luck!
Jason
Hi, what do you sew the ears on to after you cut the whole in the top? I’ve watched a bunch of videos and looked at other tutorials, but I still can’t figure it out. Do you just stitch it to the outer hat? Like, pinch the fabric down and sew through 3 layers (2 layers of hat on either side of the whole, one layer of ear)? Is hand-sewing better than a machine for this step?
The main reason this is confusing to me is because it seems like the stitching/thread would be visible and the hat would bunch up around the ears where the fabric got pinched down.
I appreciate any additional info you can provide, and thanks for the AT tutorials!
emilyo
Thanks for asking! yes, you stitch the ears on last. After the hat is made and you sew the ear pieces together, just cut two slits, insert the ears, flip the hat inside out and stitch from the inside. Hope that helps!
Jason
Thanks, I finished the hat, and along with your backpack tutorial my Finn costume is complete. You were a great help!
emilyo
Awesome!
Bryan Windson
bitte helft mir, ich will diesen Hut zu machen, wissen aber nicht, die richtige Größe dieser Reserve 1, 2, 3, die Sie zu führen setzen … Wie hast du dir??
Bryan Windson
Please me, I will help make this hat, but not knowledge, Dying right size of this reserve 1, 2, 3, the set of carts … How did you do?
vanessa
This can’t be accurate. I have blown up to 150% as stated and it looks way too big. Unless this is to allow for over an inch of seamline…which I’m not sure is the case. Can someone please tell me what scale to print this at? Has anyone actuly had success printing at 150%, if so then how much is seam? I would love to know before I waste fabric.
emilyo
It just depends how large you want/need the hat. You don’t have to print at 150%, but you will want to compare the diameter of the circle part of the hat to the size of your head. Once you get that right, then you can cut the fabric.
Jason
I didn’t blow up the pattern – instead I printed it using the Poster setting in Adobe which came out on 4 sheets of paper. I then cut everything out and taped each piece together to make the shapes.
Anonymous
you helped me the most !
Stephanie
I’m so glad I found this! I have a four-year-old Princess Bubblegum who really wants a Daddy Finn to go trick-or-treating with her.
Milo de Bruyne
I can’t print it
Jenn
About what size head fits in this hat? How do I determine how big to make it for my husband?
emilyo
Fleece is pretty forgiving, but I would say this fits an adult head. Maybe you can cut outside of the pattern and if it’s too big, then trim the excess?
Chris
I just made your Finn hat! It turned out awesome and I will wear it to a party tonight. Thanks!
emilyo
Awesome!
Tori
Hi! What percentage do you recommend printing this to fit the average head size of a 6 and 9 year old? Thank you!
emilyo
Sorry, I’m not quite sure! You should google to find out how large a 6/9 year old head is compared to an adult woman. Hope that helps!